© AWDesigns Tutorials - November 2012
This tutorial is my own creation and any resemblance to others is purely coincidental. This tutorial was written for those with a working knowledge of PSP. Please do not copy or claim as your own. Anything you produce from this tutorial is yours to do what you wish for personal use only. No profit is to be made from your results.
Materials Needed:
PSP X or any version should work.
Eye Candy 4000 – Gradient Glow on credits and text
A tube of your choice. I used the awesome artwork by Dirk Richter which you can purchase at Creative Design Outlet. You must have a license to use this art.
Scrap kit used ScrapFoxy_IB-DirkRichter-9-2 by Foxy's Designz which can be purchased at CDO
(tube is not included in the kit)
Open a new image 750 x 500 72dpi – we need room to work.
Open your tube and duplicate – close original. Copy & Paste tube as a new layer on your canvas then close the layer. Add a new layer and move below tube layer. Selections - Select All
Open Paper3_FD – Copy & Paste this paper into selection – select none. Grab you Magic Wand with these settings:
Click on each black ray on the paper. Promote Selection to Layer – Expand Selection by 1 on the promoted layer.
Add EyeCandy 4000 – HBG Noise with these settings:
Keep selected
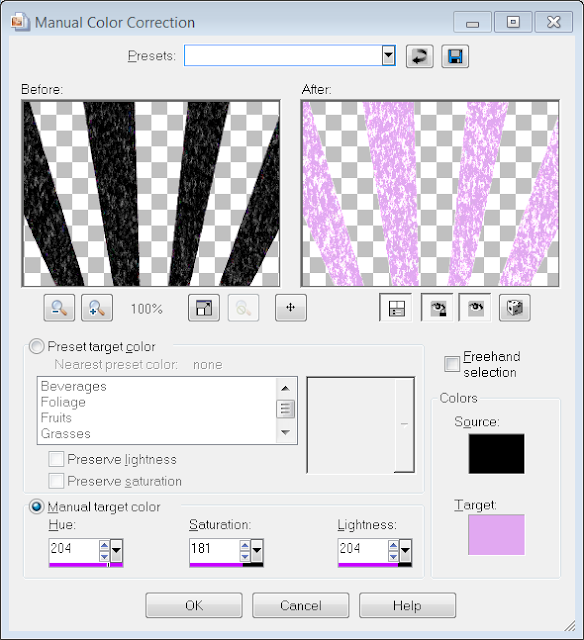
Apply Manual Color Correction with these settings or whatever color matches your tube.
Selections – Invert
Open Element16_FD – copy & paste into selection on the colored rays layer. Keep selected.
Move to the black & white paper layer – hit delete key once to remove the white rays.
Open Paper6_FD – Copy & Paste into selection.
Selections – Select None
Move to the promoted layer and add drop shadow – V/H 6, Opacity 70, Blur 5, Black.
Open Element18_FD – Copy & Paste as new layer. Image – Free Rotate Right 90 degrees, All Layers unchecked.
With tube layer closed - merge layers visible.
Selections – Select All – Selections – Modify – Contract by 20
Activate Crop Tool – Go to Image and crop to selection
Open Element2_FD, resize 54 percent, copy & paste as new layer above the background layer. Lower the opacity to 80, set blend mode to Luminance. Select inside the heart with your magic wand. Selections – Modify – Contract 3, Move to bottom layer and hit delete key once. Selections – Select None. Add drop shadow V/H 2, Opacity 30, Blur 3
Open Element15_FD and resize it 75 percent – copy & paste as a new layer, move it to the bottom of your layer palette and position in the lower portion of the heart (see tag for placement). Add drop shadow to it –V/H 6, Opacity 70, Blur 5, Black.
Open Element19_FD – copy and paste as new layer and move it to the bottom of your palette. Adjust – Blur – Radial Blur with these settings:
I manually color corrected – you can leave it gray or recolor to match your tag.
Open Element2_FD – copy & paste as new layer and move it to the top of your palette. Add drop shadow V/H 2, Opacity 30, Blur 3
Open the wordart – resize 75 percent – copy and paste as a new layer – add drop shadow V/H 6, Opacity 70, Blur 5. Position wordart where you like it, I put mine at the top (see tag).
With tube layer and wordart layer closed – merge all layer visible.
Add a new layer – move to the bottom of palette and flood fill with black or a color to match your work. Merge Visible.
At this point you can embellish with other elements – be sure to resize them and position to your liking. I added the purple lips with gradient glow in black and the curly ribbon I recolored and put below the wordart added gradient glow in black. Add drop shadows to the elements.
Reopen all your layers – resize your tube if necessary and position it where you like or see my tag for position. Add drop shadow to your liking on the tube. Merge all layers visible.
Resize your tag to the size you want – I did mine at 75 percent. Sharpen your tag.
Add a new layer and flood fill with black – Selections – Select All – Modify – Contract by 5 – hit delete once – Selections – Select None. Merge black border with your tag.
Add © copyright info, your license number and text (name or snag tag word).
Hugs~Anna


No comments:
Post a Comment